


Introduction
Steaming milk might seem like a simple task, but mastering it can elevate your coffee experience to a whole new level. Whether you’re making a latte, cappuccino, or any other milk-based coffee drink, the quality of the steamed milk is crucial. Using a Breville machine can make this process easier and more enjoyable. Let’s dive into how you can perfect your milk steaming technique with a Breville machine.
Understanding Your Breville Machine
Types of Breville Machines
Breville offers a range of espresso machines, from entry-level to professional-grade models. Popular models include the Breville Barista Express, Breville Barista Pro, and the Breville Dual Boiler. Each machine has its unique features, but the steaming process remains fairly consistent across models.
Key Features
Breville machines are known for their user-friendly design and high performance. Key features include adjustable steam pressure, digital temperature control, and a powerful steam wand designed for creating perfect microfoam.
Preparing to Steam Milk
Choosing the Right Milk
The type of milk you use can significantly affect the quality of the foam. Whole milk tends to produce the best microfoam due to its higher fat content. However, you can also use alternatives like almond, soy, or oat milk if you prefer.
Importance of Fresh, Cold Milk
Always use fresh, cold milk. Cold milk gives you more time to steam and texture it properly before it overheats. Aim for a starting temperature around 39°F (4°C).
Essential Tools and Accessories
You’ll need a stainless steel milk jug, a thermometer (if you’re not experienced enough to judge by touch), and a clean cloth to wipe the steam wand.
Setting Up Your Breville Machine
Initial Setup
Ensure your machine is clean and all parts are properly assembled. Place it on a flat, stable surface.
Filling the Water Reservoir
Fill the water reservoir with fresh, filtered water. This ensures you get the best possible steam quality.
Powering Up and Preheating
Turn on your Breville machine and allow it to preheat. This usually takes a few minutes, depending on your model.
The Milk Steaming Process
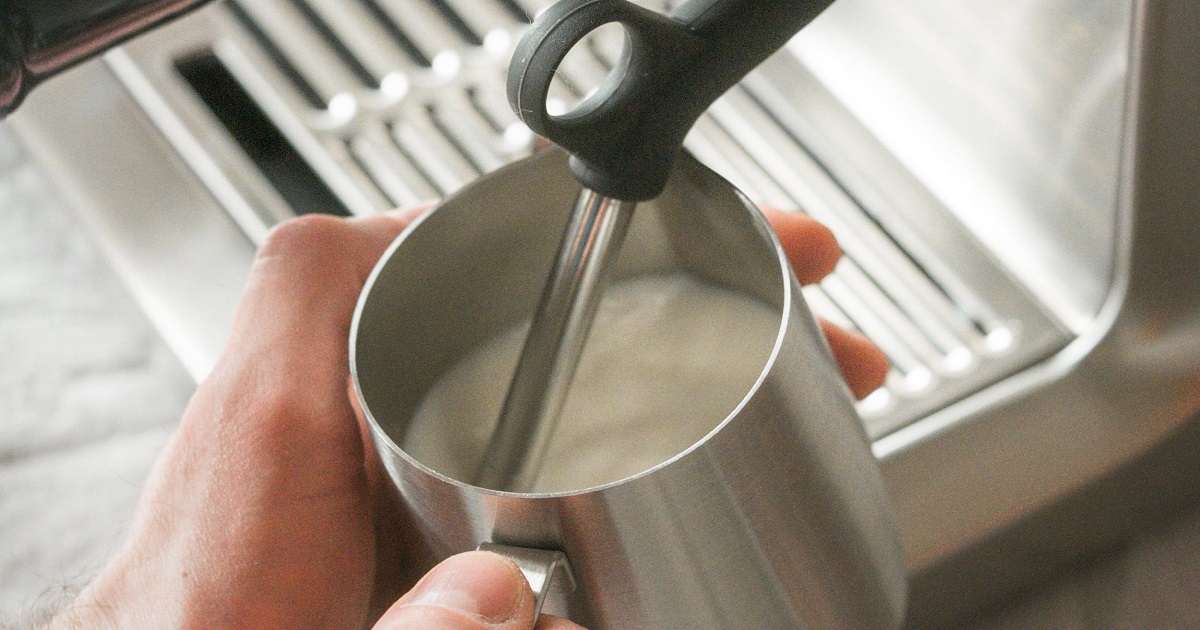
Positioning the Steam Wand
Positioning is crucial. The steam wand should be just below the surface of the milk to start. This is where you’ll introduce air into the milk to create foam.
Steaming Techniques
There are two main phases in steaming milk: stretching and texturing. Stretching introduces air into the milk, creating foam. Texturing involves heating the milk to create a creamy consistency.
Creating Microfoam
Microfoam is the velvety, smooth foam that sits on top of a well-steamed milk. It’s essential for latte art and a key indicator of well-steamed milk.
Step-by-Step Guide to Steaming Milk
Step 1: Fill the Jug
Fill your milk jug to just below the spout. This allows room for the milk to expand as it foams.
Step 2: Purge the Steam Wand
Before steaming, purge the steam wand by releasing steam for a few seconds. This clears any condensation and ensures consistent steam pressure.
Step 3: Submerge the Wand
Insert the steam wand just below the surface of the milk. Angle the jug slightly to create a whirlpool effect.
Step 4: Stretching the Milk
Turn on the steam and gently lower the jug to keep the wand just below the surface. You’ll hear a hissing sound as air is incorporated into the milk.
Step 5: Texturing the Milk
Once the milk has expanded to about double its original volume, raise the jug so the steam wand is deeper in the milk. This heats the milk and creates a smooth texture.
Step 6: Finalizing the Process
When the jug feels slightly too hot to touch (around 150°F or 65°C), turn off the steam and remove the wand. Tap the jug on a counter and swirl the milk to remove any large bubbles.
Common Mistakes and How to Avoid Them
Overheating the Milk
Milk should never be steamed above 170°F (77°C). Overheating can scorch the milk and ruin its texture.
Improper Wand Positioning
If the steam wand is too high, you’ll get large, airy bubbles. Too low, and the milk won’t foam properly.
Not Purging the Steam Wand
Skipping this step can result in inconsistent steam pressure and watery milk.
Cleaning and Maintenance
Daily Cleaning Routine
Always wipe the steam wand with a damp cloth after each use and purge it to clear any milk residue.
Deep Cleaning Tips
Regularly deep clean the steam wand and milk jug to prevent buildup. Use a mixture of water and a descaling solution for a thorough clean.
Descaling Your Machine
Descale your Breville machine every few months to maintain optimal performance. Follow the manufacturer’s instructions for the best results.
Advanced Tips for Perfect Milk Steaming
Experimenting with Different Milks
Different milks can produce different textures and flavors. Experiment to find your favorite.
Adjusting Steam Pressure
Some Breville models allow you to adjust the steam pressure. Lower pressure can help beginners control the steaming process better.
Achieving Latte Art
Practice makes perfect when it comes to latte art. Start with simple designs like hearts or leaves and gradually try more complex patterns.
Troubleshooting Common Issues
Inconsistent Foam
If your foam is inconsistent, check your steam wand positioning and ensure you’re using fresh, cold milk.
Steam Wand Blockages
Regularly clean the steam wand to prevent blockages. If blocked, use a pin to clear the holes.
Temperature Problems
If the milk is too hot or too cold, adjust your steaming time and practice to get a feel for the right temperature.
Conclusion
Steaming milk with a Breville machine might take some practice, but with the right techniques, you can achieve barista-quality results at home. Remember to use fresh, cold milk, position the steam wand correctly, and maintain your machine for the best performance. Keep practicing, and you’ll be creating perfect lattes and cappuccinos in no time.
5 Unique FAQs After the Conclusion
- Can I steam non-dairy milk with a Breville machine?
- Yes, you can steam non-dairy milk like almond, soy, and oat milk. Each type may foam differently, so some experimentation may be required to achieve the desired texture.
- Why does my steamed milk taste burnt?
- Burnt milk usually means it was overheated. Ensure you don’t steam milk beyond 170°F (77°C) to avoid scorching.
- How do I know when the milk is fully steamed?
- When the jug feels slightly too hot to touch and you’ve achieved a velvety microfoam, the milk is ready.
- Can I reuse leftover steamed milk?
- It’s best to use freshly steamed milk for each drink. Leftover milk can lose its texture and may not froth properly again.
- How often should I clean the steam wand?
- Clean the steam wand after every use and perform a deeper clean weekly to prevent milk residue buildup.